
Installing OTBTF from sources can take some time, between preparing the system with prerequisites, and waiting that the compiler finish to build the two giants Orfeo ToolBox and TensorFlow. In addition, if you compile TensorFlow with CUDA, it can takes several hours! Regarding this matter, I started to make some docker images to ease the deployment of OTBTF. With the incoming release of OTB-7.0, I had to make some updates in the OTBTF build, and decided to look how to make a container that is able to use GPU.
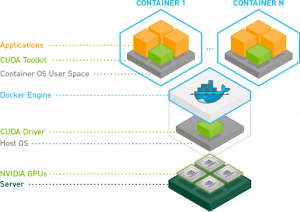
The NVIDIA runtime
NVIDIA have developed some convenient abstraction layer for using NVIDIA GPUs on docker. It handles cuda/gpu drivers of the host system, enabling its use inside the docker containers that runs on top of it.
 You can read more here.
Install nvidia-docker
First, you have to install your GPU drivers and CUDA. All the installers are available on NVIDIA website. In my case, I did that with the 430.50 driver for the GTX1080Ti and CUDA 10.1.
After everything is installed, you will need to reboot your machine. Then check that the nvidia-persistenced service is running.
| cresson@cin-mo-gpu:~$ systemctl status nvidia-persistenced.service ● nvidia-persistenced.service – NVIDIA Persistence Daemon Loaded: loaded (/lib/systemd/system/nvidia-persistenced.service; static; vendor preset: enabled) Active: active (running) since Fri 2019-10-11 15:08:40 UTC; 3 days ago Process: 1296 ExecStart=/usr/bin/nvidia-persistenced –user nvidia-persistenced –no-persistence-mode –verbose (code=exited, status=0/SUCCESS) Main PID: 1321 (nvidia-persiste) Tasks: 1 (limit: 4915) CGroup: /system.slice/nvidia-persistenced.service └─1321 /usr/bin/nvidia-persistenced –user nvidia-persistenced –no-persistence-mode –verbose |
You can also check that you GPUs are up using nvidia-smi:
| cresson@cin-mo-gpu:~$ nvidia-smi Tue Oct 15 13:48:07 2019 +—————————————————————————–+ | NVIDIA-SMI 430.50 Driver Version: 430.50 CUDA Version: 10.1 | |——————————-+———————-+———————-+ | GPU Name Persistence-M| Bus-Id Disp.A | Volatile Uncorr. ECC | | Fan Temp Perf Pwr:Usage/Cap| Memory-Usage | GPU-Util Compute M. | |===============================+======================+======================| | 0 GeForce GTX 108… Off | 00000000:3B:00.0 Off | N/A | | 20% 33C P5 14W / 250W | 0MiB / 11178MiB | 0% Default | +——————————-+———————-+———————-+ | 1 GeForce GTX 108… Off | 00000000:5E:00.0 Off | N/A | | 23% 28C P5 12W / 250W | 0MiB / 11178MiB | 0% Default | +——————————-+———————-+———————-+ | 2 GeForce GTX 108… Off | 00000000:B1:00.0 Off | N/A | | 24% 39C P5 14W / 250W | 0MiB / 11178MiB | 0% Default | +——————————-+———————-+———————-+ | 3 GeForce GTX 108… Off | 00000000:D9:00.0 Off | N/A | | 27% 33C P0 50W / 250W | 0MiB / 11178MiB | 3% Default | +——————————-+———————-+———————-+ +—————————————————————————–+ |
If everything looks fine, you can continue.
You can install nvidia-docker
| curl -s -L https://nvidia.github.io/nvidia-docker/gpgkey | sudo apt-key add – distribution=$(. /etc/os-release;echo $ID$VERSION_ID) curl -s -L https://nvidia.github.io/nvidia-docker/$distribution/nvidia-docker.list | sudo tee /etc/apt/sources.list.d/nvidia-docker.list sudo apt-get update sudo apt install nvidia-docker2 |
The OTBTF GPU docker
Run the OTBTF docker image with NVIDIA runtime enabled. You can add the right permissions to you current USER for docker (there is a “docker” group), or you can also use root to run a docker command . The following command will display the help of the TensorflowModelServe OTB application.
| docker run –runtime=nvidia mdl4eo/otbtf1.7:gpu otbcli_TensorflowModelServe -help |
And that’s all! Now the mdl4eo/otbtf1.7:gpu docker image will be pulled from DockerHub and available from docker. Don’t forget to use th NVIDIA runtime (using –runtime=nvidia) else you won’t have the GPU support enabled.
Here is what happening when docker pulls the image (i.e. first use, after the pull is finished):
| cresson@cin-mo-gpu:~$ sudo docker run–runtime=nvidia -ti mdl4eo/otbtf1.7:gpu bash Unable to find image ‘mdl4eo/otbtf1.7:gpu’ locally gpu: Pulling from mdl4eo/otbtf1.7 35c102085707: Already exists 251f5509d51d: Already exists 8e829fe70a46: Already exists 6001e1789921: Already exists 9f0a21d58e5d: Already exists 47b91ac70c27: Already exists a0529eb74f28: Already exists 23bff6dcced5: Already exists 2137cd2bcba9: Already exists 534a428e13b2: Pull complete 0becaeed2388: Pull complete 5e9d7ff39d5b: Pull complete 7bf26a9c021b: Pull complete 94433defe0a3: Pull complete 38956bf78632: Pull complete 2f2bbba7b89d: Pull complete 0dbe59534219: Pull complete f0f58d46ebcb: Pull complete 7c7ed8e68764: Pull complete 1de1d58c4952: Pull complete Digest: sha256:203915c34a8e8fad45b45a274fe7a029df789ad36628b43437bbc62d84b4400f Status: Downloaded newer image for mdl4eo/otbtf1.7:gpu root@039085b63ea3:/# |
The different stages are download from DockerHub (You can retrieve them from the dockerfiles provided on the OTBTF repository). When your command prompt prefix is “root@039085b63ea3“, you are inside the running docker container as root!
And then… how to use Docker?
Well, I do not intend to make a full tutorial about docker here 😉 In addition, I am far from being an expert in this area.
But here are a few stuff I used to make things work with docker. I don’t think at all that it is good practice, but these tips can help.
Docker run
The previous command showed you how to enter a container in interactive mode. From here, you can install new packages, create new users, run applications, etc.
Docker commit
Docker is like git. When you enter a docker container, you can modify it (e.g. install new packages) and commit your changes. If you don’t, every changes you made inside the container are erased when you leave the container (i.e. “exit” it).
Do a few changes in your running container, like installing a new package. Then, use another terminal to commit your changes:
| docker commit 3ade7b0dc71b myrepo:mytag sha256:97c41b0b12d61d78b5016f1fb69dce26448df52091345d9baafb57944c937fb0 |
Here, 3ade7b0dc71b comes from the first terminal in which your container is running. You can copy/paste the hash from the command prompt prefix (“root@3ade7b0dc71b“).
Mount some filesystem
And now you want to do some deep learning experiments on your favorite geospatial data… How to mount some persistent filesystem in your docker container?
There is useful options in the docker run command, like -v /host/path/to/mount:/path/inside/dockercontainer/ which will mount the host directory /host/path/to/mount inside your docker container as the /path/inside/dockercontainer/ path.
| cresson@cin-mo-gpu:~$ sudo docker run –runtime=nvidia -ti -v /home/cresson/:/home/toto mdl4eo/otbtf1.7:gpu bash root@e4a2b1c649c9:/# touch /home/toto/test root@e4a2b1c649c9:/# exit exit cresson@cin-mo-gpu:~$ ls /home/cresson/test /home/cresson/test |
You will have to grant the right permissions to the mounted directory, particularly once you will add some non-root users inside your docker container.
For instance, if you have a user “otbuser” inside your docker container, you can do the following:
- Check the file permissions of your host shared volume (note the GID of the volume)
- Create a new group “newgroup” which has the same GID of the volume you want to use
- Add the otbuser in the newgroup
Happy deep remote sensing!
References
- Le bloc notes de Jérôme Baudin
- NVIDIA
- Niels Søholm “Docker volumes and file system permissions” on Medium